Preface
This post is not new. I published the first version on how to create your own Power Query Editor already in November 2015 on my old blog www.powerbi-usergroup.de. Many things changed since then. First: I changed my blog and created THE SELF-SERVICE-BI BLOG. Second: Many of the details I showed in my older post to create your own editor for Power Query with Notepad++ didn’t work anymore. Several circumstances had changed, so I had to change the post as well. Now let’s go. Get your Power Query Editor 😉
Hello Power Query enthusiasts,
many of you know that Power Query is an amazing tool for data import and data transformation. It is powerful an easy to use. But there is always a BUT. It is a pain to write custom M code. The Power Query Advanced Editor comes without intellisense (auto completion), no parameter hints, no syntax highlighting, no help texts, which explain what the functions do, no nothing. The fact, that M is case sensitive doesn’t make it easier at all.
In 2015 I read the following article, written by Matt Masson. Matt is a Senior Program Manager at Microsoft and member of the Power BI Developer Team. He showed how to create an editor for Power Query with Notepad++. At that time I did not even know that it was possible to create a custom language in Notepad++. Thanks a lot Matt 🙂
Matt’s tool already had intellisense and syntax highlighting. What I was still missing was parameter hints and help texts. The number of Power Query functions are getting more every month and I am always looking for the right function for my specific problem. This is why I was investigating a bit and found a solution, which I hope will be helping others as well.
I use my editor mainly in two scenarios:
Scenario 1: Finding the right function for my problem
Using the editor makes it much easier to find the function that fits your needs. Especially the help texts help you to get more familiar with the M language.
Scenario 2: Taking a look at M code with highlighted keywords and comments
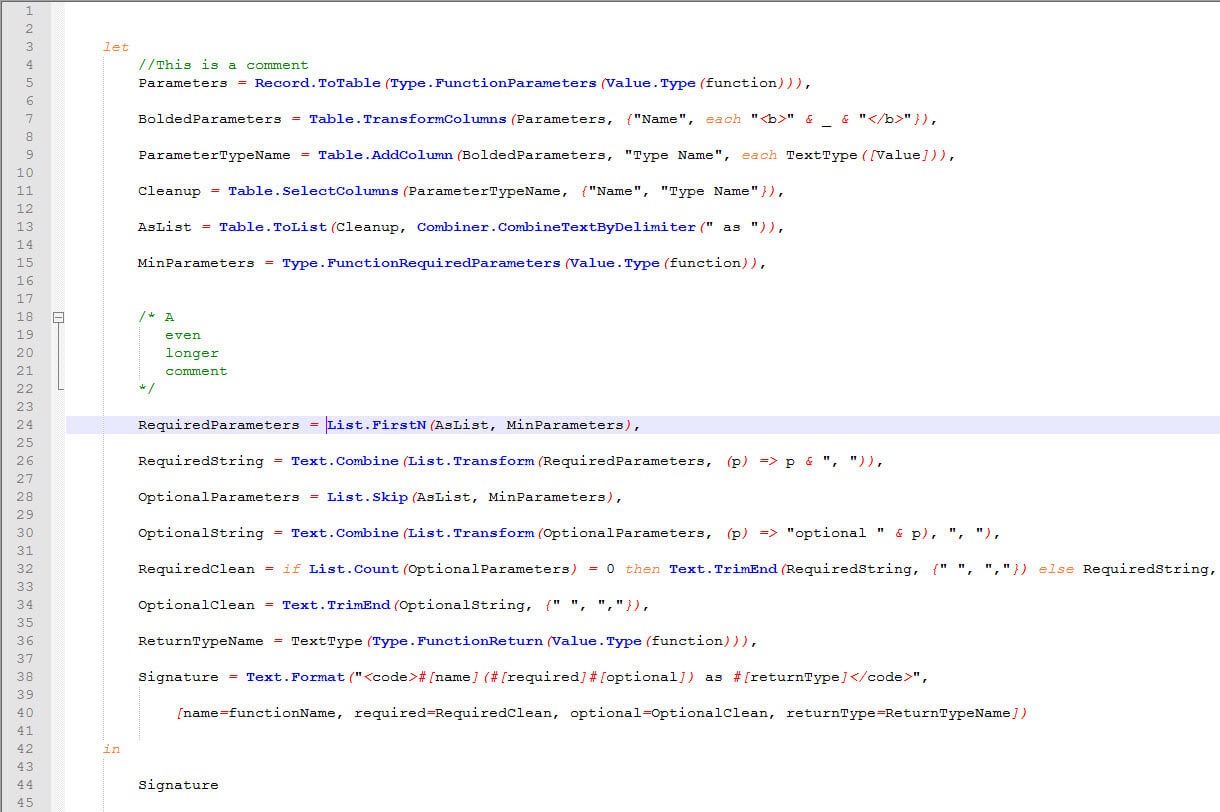
Syntax highlighting helps to keep (or get) an overview over your M code. Commenting becomes more important, the longer and complex your M code gets.
If you are dealing with these scenarios as well and you find my solution interesting, please read further and learn how to get it. It is completely FREE and will take your M Code to the next level 🙂
Let’s see how to get there.
What you need to do to get your Power Query Editor
Creating your own M editor in Notepad++ is not complicated and can be seperated in the following steps:
- Download Notepad++
- Creating Keywords highlighting via the GUI of Notepad++
- Adding parameter hints and help texts by using a specific XML file
I will guide to create your editor. Stay tuned 🙂
1. Download Notepad++
Of cause you need to download the free tool Notepad++ (e. g. from here). I installed the first version („Take this one if you have no idea which one you should take„) on my machine.
2. Creating Keywords highlighting via the GUI of Notepad++
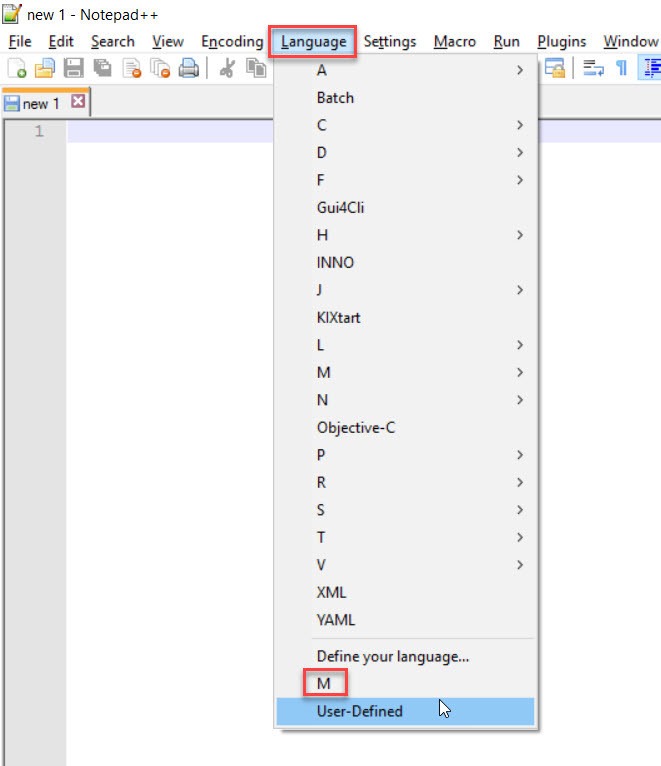
After you installed the software you need to do some modification in Notepad++. Go to Language and choose Define your language…
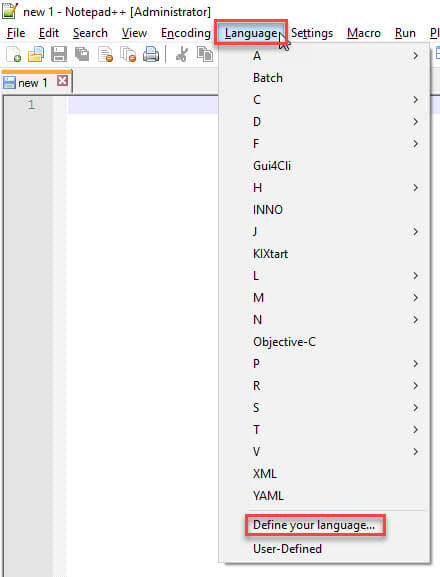
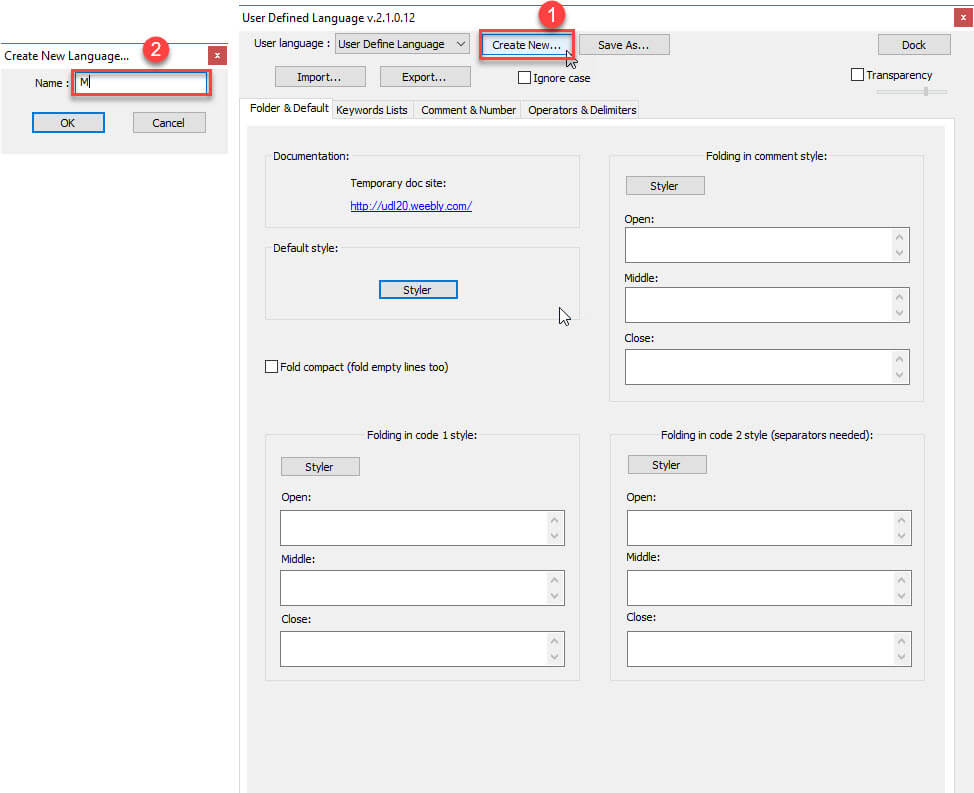
The form for defining the user defined language opens. Choose Create New… and give your language a name. I called it M.
Now you have to define special keywords and their styles. Go to tab Keywords Lists and fill the first group with all the functions from Power Query. (I provide this list for you at the very end of this article. Go there and click the link list of functions for keywords highlighting). Mark everything in Excel (ctrl + a), then copy (ctrl + c), move to 1st Group in Notepad++ and paste all the function into that box (ctrl + v). The result looks like this:
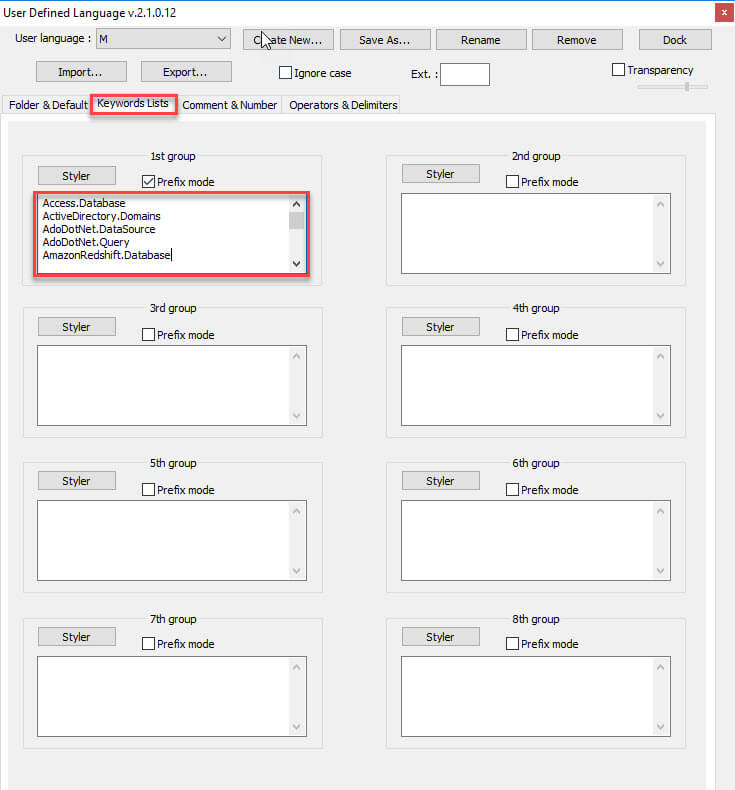
Then press Styler and style the keywords as you like it. I decide turn all my function keywords in deep blue and bold letter.
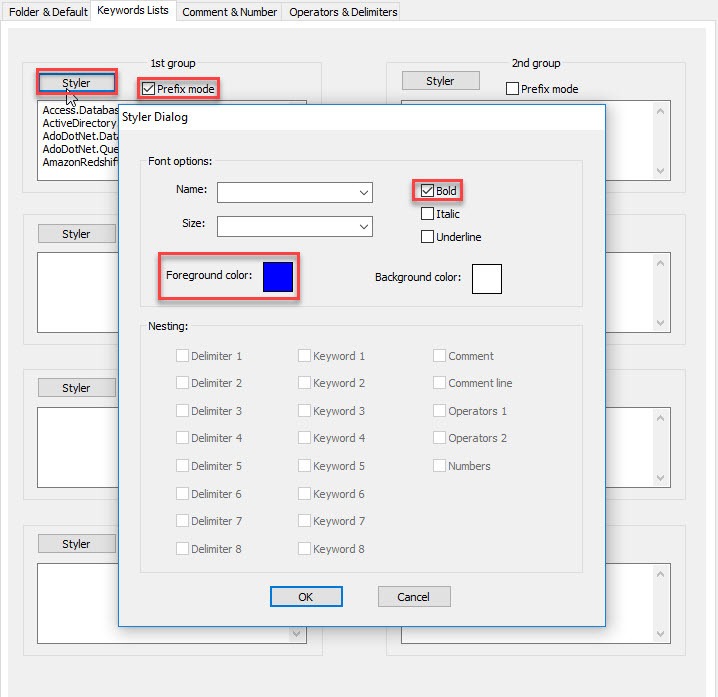
Take care also to select the check box for prefix mode. That way your keyword only get styled, when it is used as a prefix. And now comes one of the most important steps: Don’t ignore case 😉

After we have defined all functions as keywords, we need to add some more keywords. The list of keywords is not complete. Feel free to add specific keywords and adjust the styles as you like it.
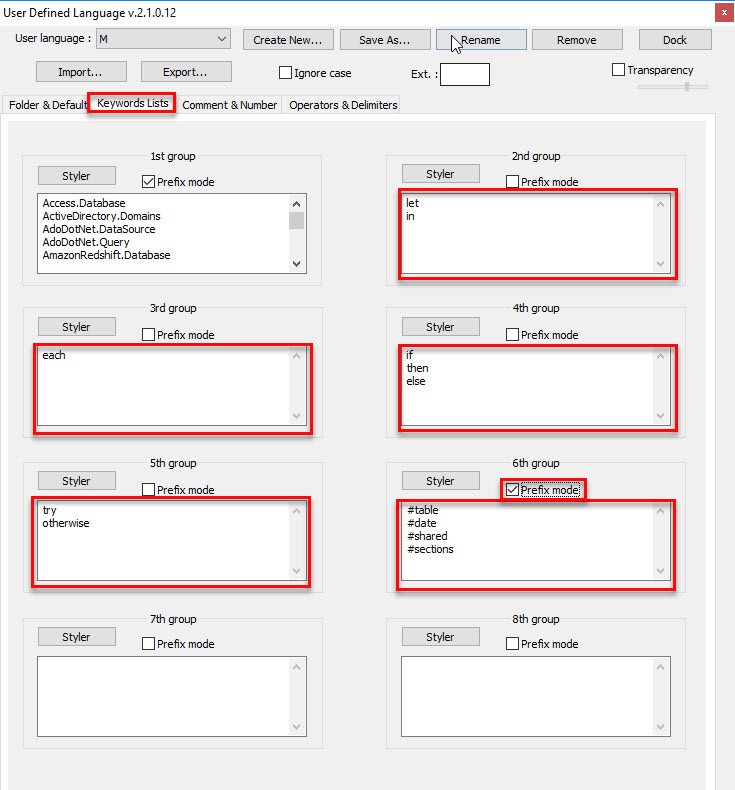
For your convenience copy the following words into the groups:
Group 2: let in
Group 3: each and as error true false is meta not or section shared type
Group 4: if then else
Group 5: try otherwise
Group 6: #binary #date #datetime #datetimezone #duration #infinity #nan #sections #shared #table #time ; Because the elements in the 6th group are used like function, take care to activate Prefix mode.
Now we’re coming to comments:
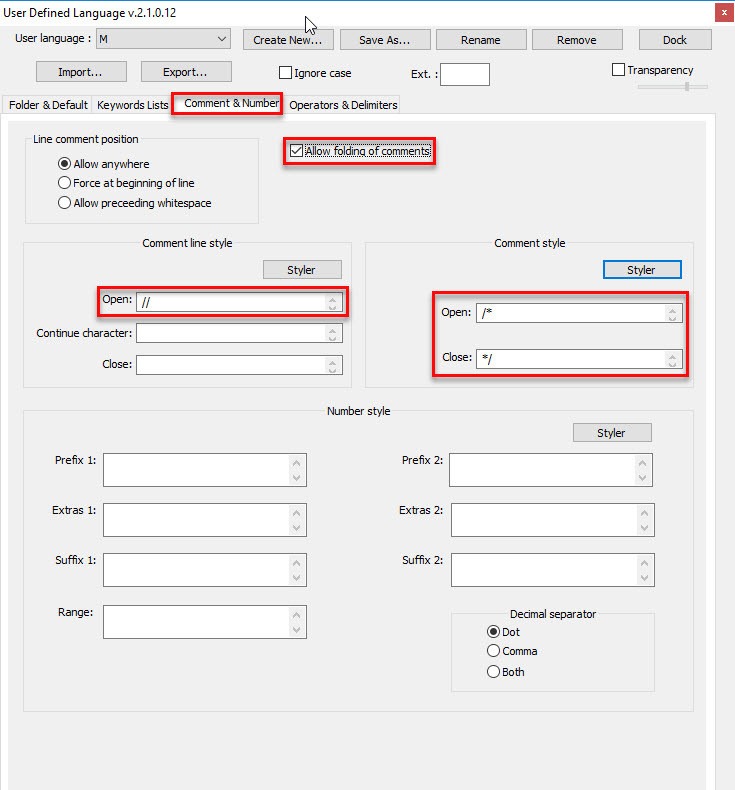
Use Styler in the same way as you did it before. I choose deep green as color for comments. To select Allow folding of comments does exactly what it says. It allows you to fold comments together, if you want to focus on the source code only.
The final step is to define the delimitors. Select the operators and deliminators tab.
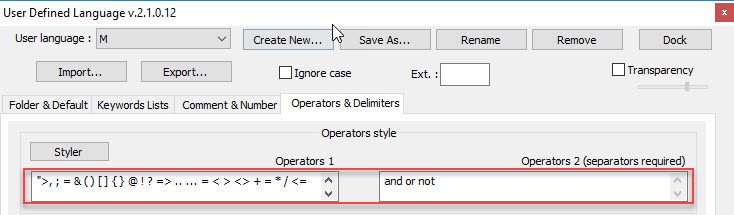
For your convenience copy it from here:
Operators1: „>, ; = & ( ) [ ] { } @ ! ? => .. … = < > <> + = * / <= >=</ #
Operators2: and or not
There is no save button. So just click the cross in the upper right corner to close the dialog.
Adding styles by pushing the button Stylers is recommended… I suggest to use red color for Operators.
Now my code already has intellisense and highlights keywords. But I am still missing parameter hints and help texts.
3. Adding parameter hints and help texts by using a specific XML file
Adding parameter hints and help texts is easy for you. I already created the necessary XML file for you. At the very end of this article you find several links to download several files. I provide two files for auto completion and help texts: One in German and one in English. Download one of the following two files English auto completion file or German auto completion file from the very end of this article and put it into your APIs folder of Notepad++. On my machine I find it under …
C:\Program Files (x86)\Notepad++\plugins\APIs
Now restart your Notepad++, press ctrl+n for a new window and choose “M” as your language (as you can see in the following screenshot).
Now have fun writing M-statements much easier than before 😉
TAKE CARE: The name of the new language and the name of the XML file has to be the same. If you decide to use something different from M, keep this in mind.
After each update of Power BI Desktop I will provide you with new files at the end of this article. Then just do 2 things:
- Download the List of functions for Keywords highlightings. In Notepadd++ go to Language –> Define your language. Then go to tab Keywords Lists, delete all old Keywords from 1st group and put in the new Keywords from the List of functions for Keywords highlightings.

Replacing old Keywords by new
- Download the XML file again and replace the old file (in folder …plugin\APIs\) by the new. That’s it.
See you next time and keep in mind: Sharing is caring. If you liked this article, feel free to share it
Greets from Hamburg,
Lars
Download files
8th of August 2018
This update contains 2 new functions:
- Cdm.MapToEntity()
- Python.Execute()
List of functions for Keywords highlighting
Attention: If these links prompt you to log in with your Microsoft account, please try Microsoft Edge. OneDrive is a bit bitchy at the moment, although I have released the link for everyone (without the need to log in).

Lars ist Berater, Entwickler und Trainer für Microsoft Power BI. Er ist zertifizierter Power BI-Experte und Microsoft Trainer. Für sein Engagement in der internationalen Community wurde Lars seit 2017 jährlich durch Microsoft der MVP-Award verliehen. Lies hier mehr…
Mohamed GadAllah meint
Hi,
Thanks a lot for this tool as it was beneficial.
Since an updated version for the latest functions is no longer available.
I’ve tried this one here:
https://marketplace.visualstudio.com/items?itemName=PowerQuery.vscode-powerquery
It worked for Visual Studio Code Editor.
Take a look, if you need an updated tool.
Hope this helps.
Thanks
Gareth meint
Thank you Lars!
Feeding back, I found the latest version of Notepad++ I was using I had to place the xml file into the „autoCompletion“ folder in the root install of it.
Best
Gareth
Sian Doherty meint
Wow. That’s very impressive. Thank you so much. So helpful. I notice that the last update was 2018 though, is there a new list of functions and auto-complete.xml (it’s now May 2022) ? Or is it enough to click on the files and they are already updated?
Thank you again. Very helpful
Lars Schreiber meint
Hi Sian,
thanks for your feedback. As there is intellisense in Power Query for Power BI Desktop, I don’t update this tool anymore.
Thanks and regards,
Lars
RaiSta meint
Hi Lars,
even though the advanced Editor in PQ meanwhile shows syntax highlighting and (a very cryptical version of) intellisense I still prefer copying my M-code into N++ for
* printing
* text search
* better overview
Therefore I would like to have the functionality in N++ at curent level – can you tell, how to distill the function-lists from PQ and also the Autocomplete? If successfull I would be ready to post the results here, too.
Thank you for your work!
fVoss meint
I have been using this for years. It is a real life-saver. I ran into an issue while adding the UDL in a new computer:
• The period character was not recognized as the decimal separator and
thus numbers with decimals were displayed in two colors (the desired pale green before the period and black from the period onwards)
The way to solve the issue was removing the number range operator „..“ from the list of „Operators1“ and adding it to „Operators2“. Now the number range operator is only highlighted if enclosed by whitespace characters, but that is better for me than having bicolor numbers everywhere.
Is there a way to get the best of both worlds, i.e. having periods recognized as decimal separators and „..“ as a regular „forward“ operator.
NEXEA meint
AT
Data Science Course meint
Fantastic informative article! I’m basically getting willing to over this advice, is quite beneficial my own friend.
Data Science Course Syllabus meint
Additionally, this is an excellent article which I truly like studying. It’s not everyday I have the option to see something similar to this.
Data Science Course In India meint
Fantastic article I ought to say and thanks to the info.
Data Science Course meint
Very wonderful informative article. I appreciated looking at your article. Very wonderful reveal. I would like to twit this on my followers. Many thanks! .
Josh Nourse meint
Working great!
Does not look like I can upload a pic. Look for the „Ext. :“ in the definition dialog. I entered „pq powerquery“
Save your files as .pq, now they will automatically open with the M language
Also, You can Export and Import all of the manual steps above. After going through steps click export and save the xml file. Send it to someone and they can just import it.
I saved mine to %appdata%Roaming\Notepad++\userDefineLangs
Jiri meint
Hi Lars,
thank you for all of this – it is really great.
Currently there is a small trouble with english XML file for autocompletion caused by „&“ in rows 1157 and 1188: „descr=“Returns the current date & time…“
After replacing „&“ with „and“ the file is ok:
„descr=“Returns the current date and time…“
Best regards,
Jiri
Daniel H Paul meint
Hi. I followed your instructions to the letter. but the inellisence simply will not work. I download the M.xml file into the Plugins/APIs folder but it simply doesn’t work. Any ideas?
Alberto meint
Hi,
this post is very helpful, thank you very much.
For info, I have a portable version of notepad and I do not have the folder …\plugin\APIs\. For me the right place where to put the xml file for autocompletion is:
…\Notepad++Portable\App\Notepad++\autoCompletion
I hope this will help others!
Thank you again,
Alberto
Lars Schreiber meint
Hi Alberto,
that is very valuable information. Thanks for this info 🙂
Cheers,
Lars
Burkhard Bräkling meint
I have the same directory structure but can’t get intellisense to work. Downloaded German version of the XML. Anybody out there with a similar challenge?
Francis Blake meint
I build an Excel book that contains to PQ queries. These provide up-to-date lists of keywords (in three groups: functions, constants and types), and produce the XML code for the function hints in Notepad++.
The only thing is that I don’t know where to put that XLSX so it is permanently available to anyone. Let me know if you can help.
The great benefit is twofold. First, I no longer have to wait for online, published Notepad++ M definitions to be updated, and frankly, some of the people who put them up there should not have to be burdened with updating them whenever required. Secondly, there is no online definition that exactly works the way I want, so if I had to download one at each update, I would also have to adjust it at each update.
xcxvmhhbuf meint
cltljpltnxvarnvjjlneptceppfztf
RossV meint
Thank you Lars!! I read your post on PowerBI community forum, but couldn’t ‚like‘ the post as Microsoft wanted me to log in with an admin account! Crazy, I know.
Anyway, thanks for the detailed instructions, it makes a lot of difference.
Cheers
Lars Schreiber meint
Hey Ross,
thanks for taking the time providing feedback. I am happy, that you find it helpful 🙂
Cheers
Stefan meint
Hi Lars,
Thanks a bunch for the amazing article.
I am trying to set it in my Notepad and found out that the link fro „list of functions for keywords highlighting“ actually opens the ‚German autocompletion file“
May you please check is it me doing something wrong or the link is incorrect.
Best regards,
Stefan
Stefan meint
Apologies fro the spam, now it works fine, obviously issue on my end
Thank you once again fro sharing and maintaining this!
Lars Schreiber meint
Hi Stefan,
thanks for your feedback and great that you could solve the problem yourself.
Cheers,
Lars
Max meint
Muchas gracias por este MEGA TIP!
Excelente aporte.
Lars Schreiber meint
Estoy muy contento de que esto haya sido una ayuda para ti 🙂
Binepal Singh meint
Thanks for this, it will be useful. I am not able to access the English completion file. When I click it, I get an empty browser page. Can you please send another link if possible?
Arek meint
Hi, I have a Notepad++ v7.6.6 and in case anyone had the issue with autocompletion here’s the answer: move the file M.xml to C:\Program Files\Notepad++\autoCompletion folder instead of
C:\Program Files\Notepad++\plugins\APIs
George meint
Thanks Arek!
Sabine meint
Thanks, Arek!
Javier López meint
Hi Lars
I am very happy, I have discovered the solution.
At the end you were right, there was a shortcut (Ctrl +Mouse Double click) over a parenthesis in order to get the scope of parenthesis. The issue is that if the scope of the nested parenthesis is more than a line it doesn’t works… this is the default option. But Eureka! this can be configured! Just go to Settings+Preferences+Delimiter and check in „Allow on several lines“.
These tip is super as it works for all the languages!!!
Yours
Javier
Lars Schreiber meint
Hi Javier,
I am very happy you could solve the problem on your own and a BIG thank you for letting me know your solution 🙂
Cheers,
Lars
Javier Lopez meint
Thank very much. This is a great help to code in M!
I wonder if there is the possibilty to mark the matching parenthesis in the code, and the code between them.
I have seen Ctrl+B and Ctrl+Alt+B dor brackets but nothing for parenthesis!
Is it possible to change any style in order to get this facility?
Thank you very much in advance for any hint or suggestion
Javier
Lars Schreiber meint
Hi Javier,
thanks for your feedback. Honestly I am not a heavy user of Notepad++ shortcuts, but here is a list of all documented shortcuts of Notepad++, so maybe you’ll find what you’re looking for?!
Cheers,
Lars
Javier López meint
Thank you Lars
Maybe I didn’t explain properly. I am not looking for shorcuts. In the matter of fact there’s no one for „parenthesis“ (there is one for matching braces Ctrl+b)
I would like to look for the „matching parenthesis“ in M. I cannot see how to do it. I thought that just defining an style in the user-defined counfiguration for M then I could. For example there you can do something similar for comments, with the open comment /* and close comment */
In M there is sometimes a lot of levels of identation and it is no easy to find out the scope of a parenthesis….
Anyway, thanks a lot for sharing your work
Javier
Jim Chisholm meint
The Notepad++ solution is still viable because some of us do not have access to Power BI due to corporate IT constraints.
Lars Schreiber meint
So what you’re saying is, I should continue updating my Notepad++ editor?!
Jim Chisholm meint
I’m saying the need still exists but the audience is certainly smaller than it once was.
I can see where, if you’re not actively using Notepad++, it would be more difficult to keep the M configuration files up to date.
I can likely figure out how to update the M.xml file myself from the NPP docs.
If you could share how you’re tracking the current list of keywords and functions (and generating the help text) that would certainly help.
Jim Chisholm meint
Lars,
Excellent tutorial.
Thanks for sharing. You’ve made my M coding time more efficient AND pleasant.
Jim.
Lars Schreiber meint
Hey Jim,
thanks for your positive feedback. Have you read my other post: https://ssbi-blog.de/technical-topics-english/intellisense-for-power-query-m-finally/. I wouldn#t recommend using my Notepad++ editor anymore, because MS implemented a very usefull editor in Power BI Desktop. Use this one and copy the code into all the other M editors (e. g. in Excel). Thanks and have a wonderful day,
Lars
Ari meint
This article is great and has helped me develop in Power Query M. There is an error.
This query:
„Hello World#(cr)#(lf)Hello Again*/*CommentHello*/“
will return
Hello World
Hello Again*/*CommentHello*/
However the user-defined language used here will put the /*CommentHello*/ section in light green to indicate that it is a comment.
This is an issue for me because I have a variable that needs to be equal to the string */*
Thank you again
Lars Schreiber meint
Hi Ari,
thanks for your comment. As Power BI Desktop has currently implemented intellisense, I suggest developing your M code inside Power BI Desktop (w/ intellisense) and then copy it were you need it (propably Excel?!). I have written about my first experience w/ the new editor in PBI Desktop here: https://ssbi-blog.de/technical-topics-english/intellisense-for-power-query-m-finally/. Due to this new development, I will no longer support my Notepad++ solution, as there are better opportunities. I hope for your understanding.
Cheers,
Lars
Johan meint
Fantastic work. I have stayed with the GUI since M seemed complex, but now I will give it a try. Thank you!
/Sweden
Lars Schreiber meint
Hi Johan,
happy, that it makes you write plane M code in the future 🙂 But there are even better news. In the very near future, Power Query will have a native editor, at least in Power BI Desktop, so mine won’t be needed anymore.
Cheers,
Lars
Clemens meint
Hi Lars,
there is an error in the new version of the english autocompletion file. Description is still good, but all parameter hints are identical, like this:
The german version is good.
Hope you can fix this easily. Anyway, this is still fantastic!!
Cheers,
Clemens
Lars Schreiber meint
Hi Clemens,
you’re right. Thanks for that hint. I already fixed it, even though the next Power BI desktop release is very close 🙂
Thanks again and have a great day,
Lars
Ivan M. meint
Very useful thing! Thank a lot, Lars
Lars Schreiber meint
Thank you, Ivan 🙂
Gerhard Brueckl meint
Hi Lars,
you can also export the whole definition of a User Defined Language into a single XML. This way the users would not need to do all the steps describes in this post manually but could simply import the UDL XML file.
maybe you could also add the UDL definition file here, this would save a lot of time for the users 🙂
regards,
-gerhard
Lars Schreiber meint
THANK YOU Gerhard,
I didn’t really know that. This shortens the process considerably. I will shortly adapt the post and offer the XML files for download in the future.
Greetings, Lars
Claude meint
Hi Lars,
Thank you a lot for this, it will help me a lot.
Have you done the unique xml yet? Then you could had it to this page :
http://docs.notepad-plus-plus.org/index.php/User_Defined_Language_Files
Look at the bottom of the page for an explanation on how to contribute.
Lars Schreiber meint
Hello Claude,
thanks for your feedback 🙂 No, I haven’t created the xml yet. I will do that until the next update of PBI Desktop is released and add a additional description to my post, which describes how to use these files. Also thanks for the link. I will give it a try, but I hope that my editor won’t be needed so much longer 😉
Regards,
Lars
Santosh meint
Excellent – thank you
Lars Schreiber meint
Happy that you like it 🙂
Vasyl meint
Thank you. It’s very useful
Lars Schreiber meint
Thanks for your Feedback. Happy when it helps
Mads meint
Maybe you should add that in order to get the hints you also have to enable
Settings -> Preferences -> Backup/Auto-Completion -> Function parameters hint on input
Stuart Hoffmann meint
Thank you!! Very helpful!! I am using this and wanted to share one tweak. I had an issue where Notepad++ was confusing a text string containing a URL as a comment.
My tweak was to add quotes as a delimiter (Operators and Delimiters tab). It changes both the delimiter and the delimited text to the new color.
Lars Schreiber meint
Hello Stuart,
thanks for your tweak. Happy to hear, that this tool is useful for you 🙂
Regards,
Lars
Alberto meint
Amazing job, thank you!
I am attending a PowerBI course with my colleagues, today I’m going to astonish them with this Notepad++ trick!
Ted Murphy meint
Hi Lars,
This is a superb facility. Thank you.
Like Knoll in his message on April 2nd 2017, I am not seeing the Help Text for the selected functions.
Could this be related to the version of Notepad++ that I am using? There was a 64-Bit version already on the PC (v7.3.3) and I put the M.xml file into the relevant folder in the Program Files folder.
Look forward to hearing from you when convenient.
Many thanks.
Clemens meint
Hi Lars,
thanks for this!! I loved Notepad++ and PowerQuery already, but now even more…
I had the same issue as Kroll and Ted. I just copied the xml file to \Users\*username*\AppData\Roaming\Notepad++\plugins to solve it.
Thanks again,
Clemens
Lars Schreiber meint
Hello Clemens,
thanks for your reply. I could never reproduce this problems, so thanks for your solution.
Regards,
Lars
Jeremy Baynham meint
Great post, but does anyone else find it nigh on impossible to get the reserved words out of the link for the CSV that opens in Excel online? Can’t save, can’t copy and paste more than a handful at a time, it is really painful!
Lars Schreiber meint
Hey Jeremy,
thanks for your feedback. Didn’t hear about the copy/paste problem before. I fixed it, so you can download the complete file. Hope that helps 🙂
Regards,
Lars
Dan Bliss meint
Lars,
This posting very much helped me write in M. Thank you very much. Please tell me what you do to highlight a user defined token, such as user-defined function & parameters. Thanks,
Dan
Kroll meint
Hey Lars,
Thank you for sharing that with the world!
One question – what could be the reason for help texts now showing up?
I followed your instructions, and the list of functions shows up when I start typing, but when I select a function and open the left bracket nothing happens.
What could be the reason for that?
Lars Schreiber meint
Hi Kroll,
you’re welcome 🙂
The list of functions comes from the values you put manually in the 1st group box in the Keywords Lists tab.
You don’t see help texts and I guess, that you don’t see parameter hints either, right? Then something doesn’t work with the xml file. Try to find the ansswer to following questions:
– Did you put it in the right folder of Notepad++?
– If so: Does your xml file have the same name as you named it under user language in notepad++ (in my example „M“)?
Please give me feedback, if this helped you.
Regards,
Lars
Denis meint
Great work! Thank you vary much. Do you plan to do so for DAX ?
Lars Schreiber meint
Hey Denis,
thank you 🙂 No, I am not planning this for DAX for several reasons. On the one hand the DAX editor already supports intellisense, synthax highlighting and help texts. What are you missing? On the other hand I honestly have no clue how to get all the necessary meta data of the DAX synthax out of Power BI Desktop.
Regards and thanks for you feedback,
Lars
Michael meint
Use DAX Formatter on SQLBI.com page and it will automagically format your DAX code.
Bertrand d'Arbonneau meint
Very useful. I love it. Many thanks.
Lars Schreiber meint
Hi Bertrand,
happy to read that 🙂
Regards,
Lars
Lots of updates for Power BI plus a Power Query Editor? | Guy in a Cube meint
Get your own Power Query Editor using Notepad++ (@SchreiberLars)
David Moss meint
Hi Lars, this is so cool…. I’ve been looking for something similar for ages.
Power Query Intelisense
Thks will share with my network aswell.
Lars Schreiber meint
Hey David,
happy when it helps. Thanks for sharing 🙂
Regards,
Lars
Doug B meint
Excellent resource. Thank you for sharing!
Lars Schreiber meint
Hey Doug,
really happy when this is helpfull 🙂
Regards,
Lars
Mike Hawryluk meint
Fantastic….now the question becomes how did you create this faster than Microsoft could implement it.
Super job…will be sharing with my network!
Lars Schreiber meint
Hey Mike,
thank you very much. Happy when it helps 🙂
MSFT is already doing a great job on building the whole Power BI Platform. I think implementing an „integrated“ editor is much more work than building this one in Notepad++. I know they are working on it and in a couple of months my workaround can be replaced by an integratd solution. I would love to see that soon 🙂
Regards,
Lars
Lars Schreiber meint
Hey Mike,
I am very happy to help 🙂 To highlight your custom function simply add it to the „Keywords lists“, 1st Group. That highlights the function (not the parameters). In order to get parameter hints open the „Auto completion files“ I provide you with, with a XML editor (e. g. Notepad++). For each function you see different line of code. Try to adapt that for your custom function. For better explanation see this link: http://docs.notepad-plus-plus.org/index.php/Auto_Completion
The section „How to create keyword auto-completion definition files“ should contain any necessary information for you.
Hope that helps,
Greets from Hamburg,
Lars